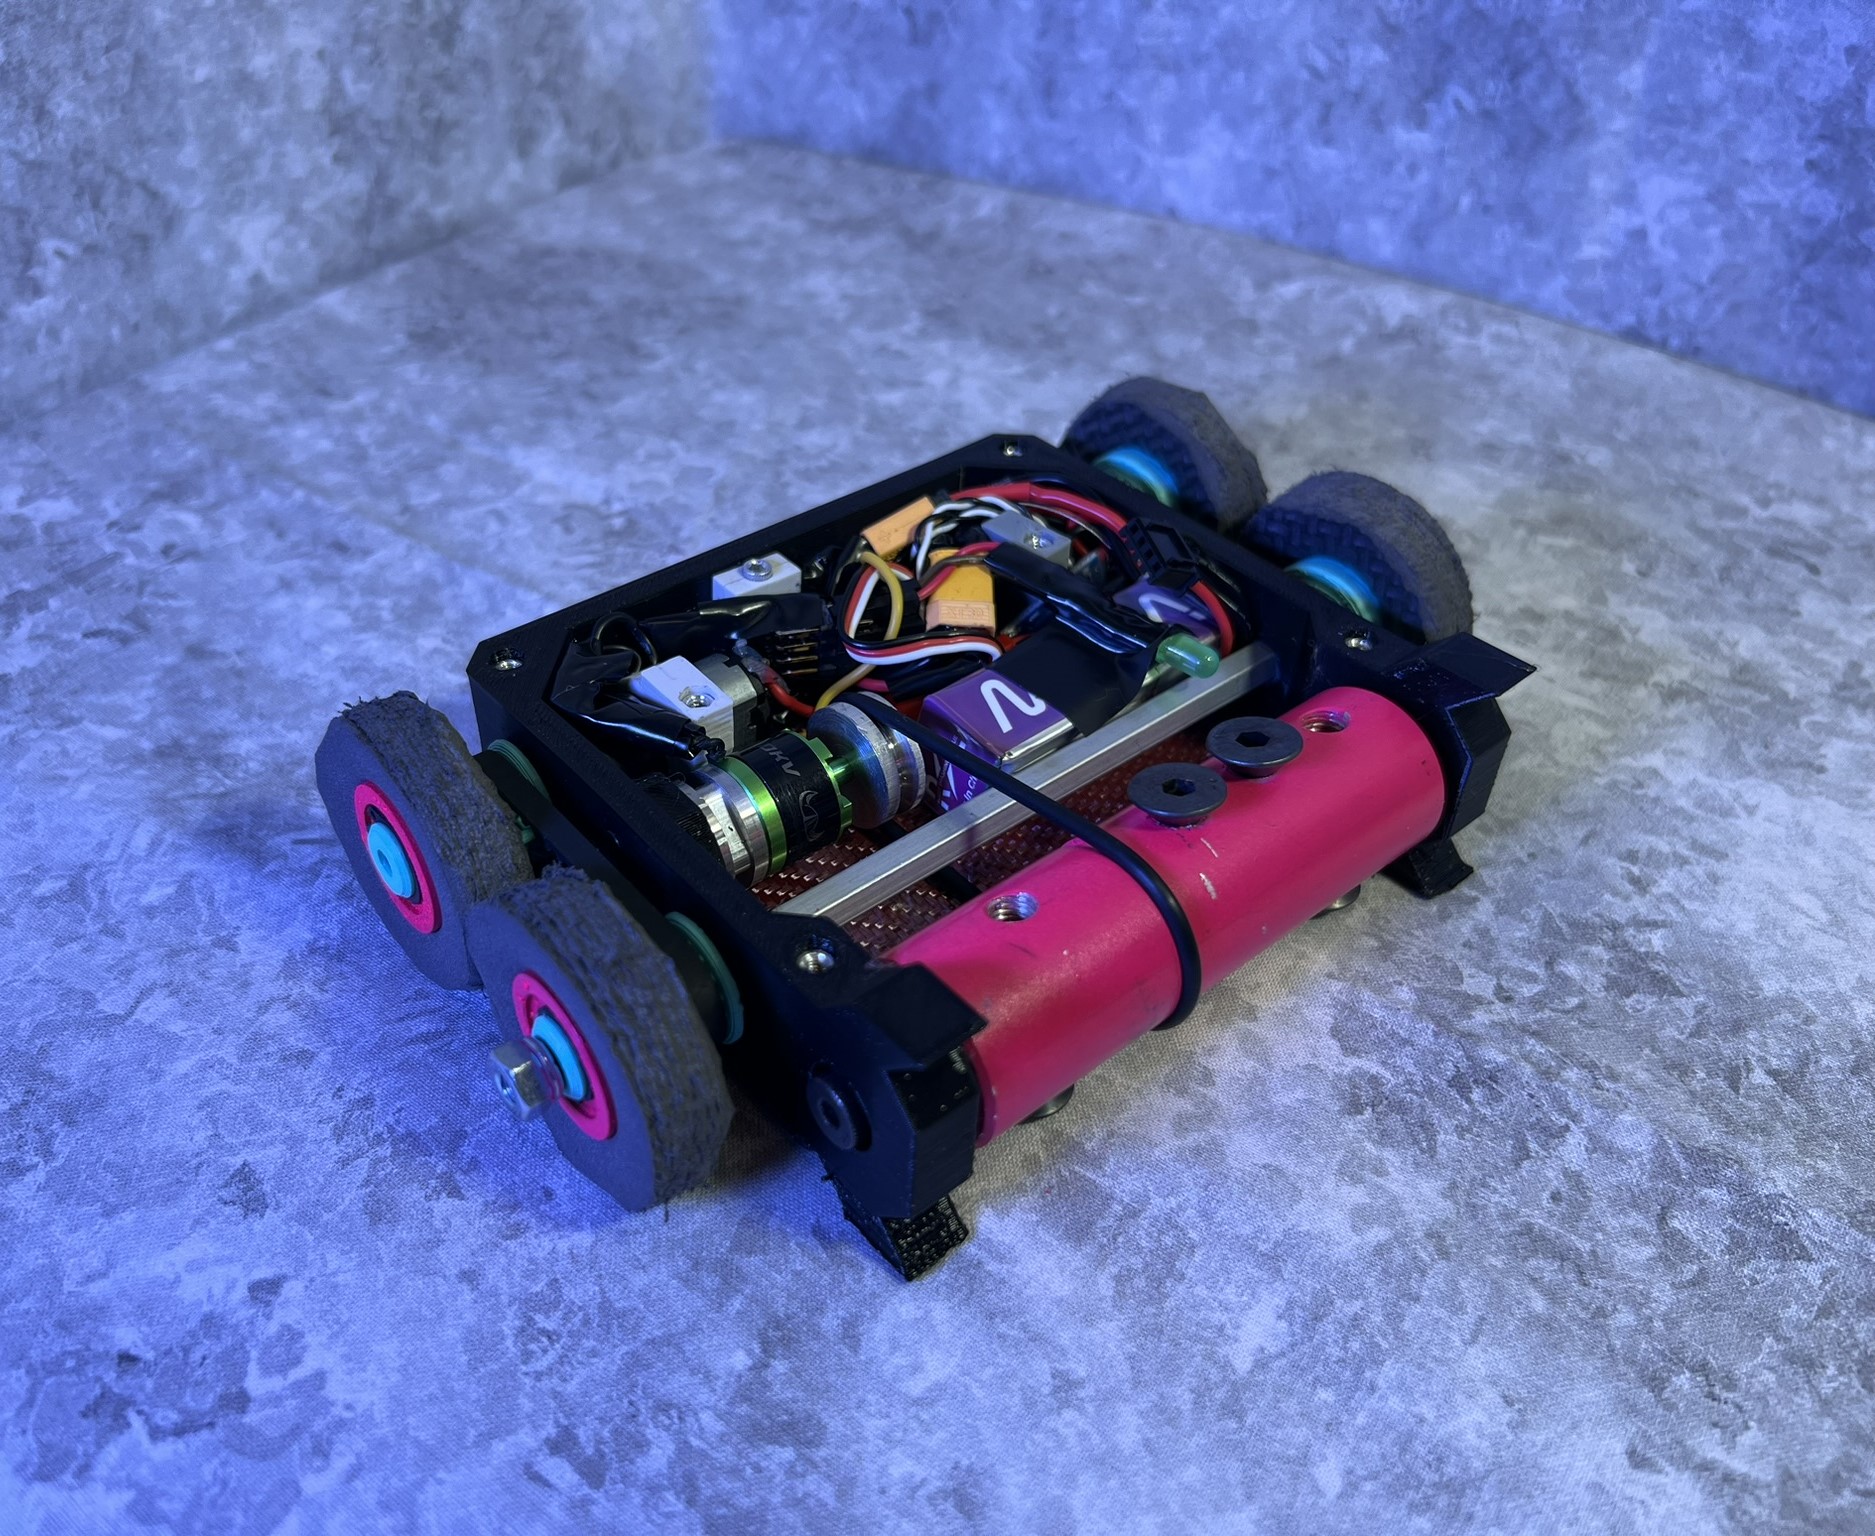
Blastwave V
1lb Drum Spinner (2024)
For an overview of Blastwave as a design, please go here
After the spectacular failure of Blastwave IV, where it lost one fight due to electrical issues and another by being completely eviscerated mechanically, I knew exactly what I needed to fix. Despite me joking to all my friends and family that I would permanently retire Blastwave if V4 disappointed me, the solutions to these problems were just too clear, and I had to take another swing at the design.
The primary failures of Blastwave 4 were due to:
- Improper Battery selection
- Not able to discharge enough current
- Not enough capacity
- PLA Frame got wrecked completely by a horizontal spinner
The solutions to these problems were simple.
The battery issue could be solved by replacing my 3S 120mAh 25C battery with a 3S 380mAh 90C battery. Not only would this increase capacity by 216%, but increase the discharge (C) rating by 260%! With this battery, I should be able to not only drive for the full 3 minutes without issue, but also be able to spin my weapon and drive without issue. This would come with an increased weight and size issue, but if I planned the whole bot around this battery, I should be able to make it work.
The frame issues could be solved by replacing the PLA filament used with TPU. There's a reason nobody uses PLA for combat robots anymore, it's just too brittle, any hit and it just shatters. I had kept using PLA for two reasons: To see if I could, and because I didn't have the capabilities to print anything else.
However, the failure of Blastwave 4 coincided with both of my printers breaking, and I was sick of fixing them. I bought a Prusa i3 and have had zero issues. This meant that I could print the new big thing in combat robotics filaments: TPU. This filament is extremely flexible and impact resistant, which makes it the perfect choice for combat robotics frames and armor. The specific TPU I'm using is Overture High Speed TPU, printing with a modified version of the Prusa FLEX profile. It prints extremely well, though it does have some stringing, especially when trying to print in a humid area. I did try a filament dryer, but didn't see much difference when I was attempting to print due to the dry North Dakota Winters.
While these two problems had dedicated solutions, there were a couple other changes I wanted to make.
On V4 I had tried metal plates on the sides of the weapon assembly to prevent the sides of the chassis from squeezing the sides of the drum. This was an attempt at using the shoulder bolt as a structural member as I have been unable to find any threaded shafts with two nut ends. The plates were supposed to constrain the head of the shoulder bolt, but this didn't seem particularly worthwhile. It took up extra weight, got bent extremely easily, and didn't even do what it was designed to that much. This feature would not be returning for V5.
What would be returning for V5 was the embedded standoffs in the chassis. Especially because of the newfound flexibility of the TPU chassis, I wanted to make sure there were super rigid posts running through the bot.
Additionally, I wanted to move away from the 20mm spur gearboxes. These were heavy (about 40g each!), and were less resilient than I would have hoped. While I had used them to great effect in Stomp Bot, I wanted to cut weight to focus on armor.
With regards to armor, the lids on Blastwave V4 were extremely thin, about 1mm of PLA. these tore extremely easily and I was not impressed. I didn't have enough weight to run anything heavier, so I YOLOed it, but I wanted to solve that for this iteration. The lids would be CNCed Carbon Fiber, to hopefully build in more rigidity to account for the flexible chassis.
The weapon system would also remain the same as the past two iterations, a discontinued Viking quadcopter motor, a small CNC machined spacer for heat dissipation, and a BlHeli_32 ESC with the startup power set to maximum.
This is where things get kind of hard to follow. I did several significant revisions in the CAD for this bot, each of which will be given a revision number to distinguish them.
5.0 - 4x 14mm Spur Gearboxes
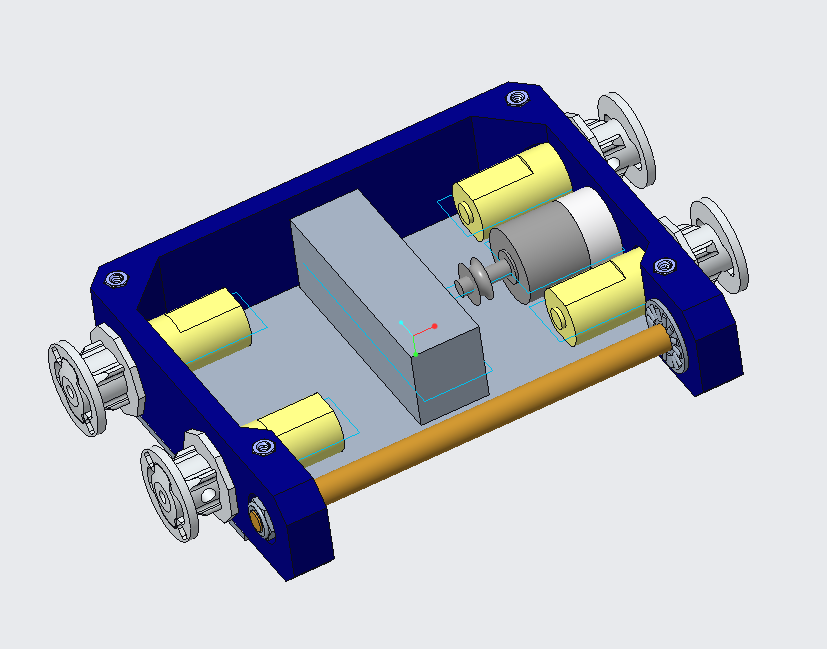
The first iteration of the robot was designed around these 14mm spur gearboxes that are basically just upgraded versions of the ones run in Blastwave V1 and V2. These are extremely light compared to the 20mm spur gearboxes, which would allow me to go back to direct driving the wheels and removing the belt system. While these would allow me to cut a significant amount of weight from the drive system to focus on the electrical changes I wanted to make, they would likely still have reliability issues, and I was convinced by several people on the MRCA discord to drop this idea. These motors are also 6V, so that would mean dropping my voltage down to 2S instead of 3S, losing out on weapon power that this bot sorely needs.
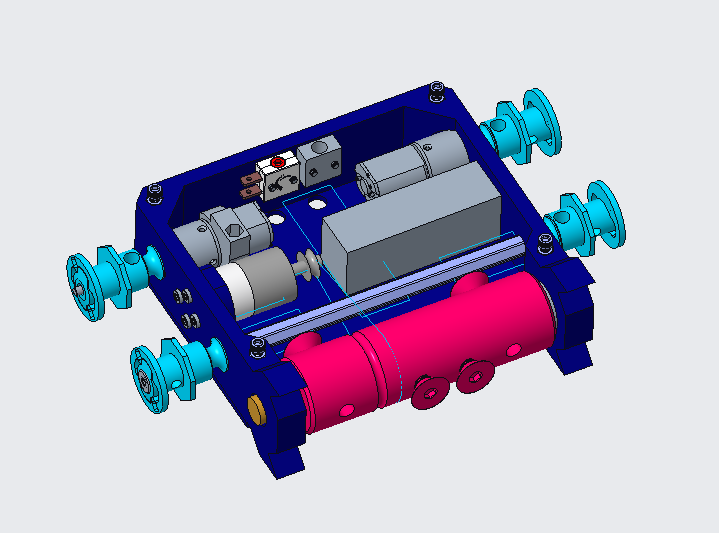
5.1 - Belt Driven Repeat Brushed
The current state of the art in brushed Antweight combat robotics is the Repeat drive Brushed, which is a 16mm planetary gearbox, which is astonishing. There isn't really any other planetary gearbox that can work at this weight class, which means that if you want the extra reliability and toughness that planetary gearboxes bring, this is really your only option.
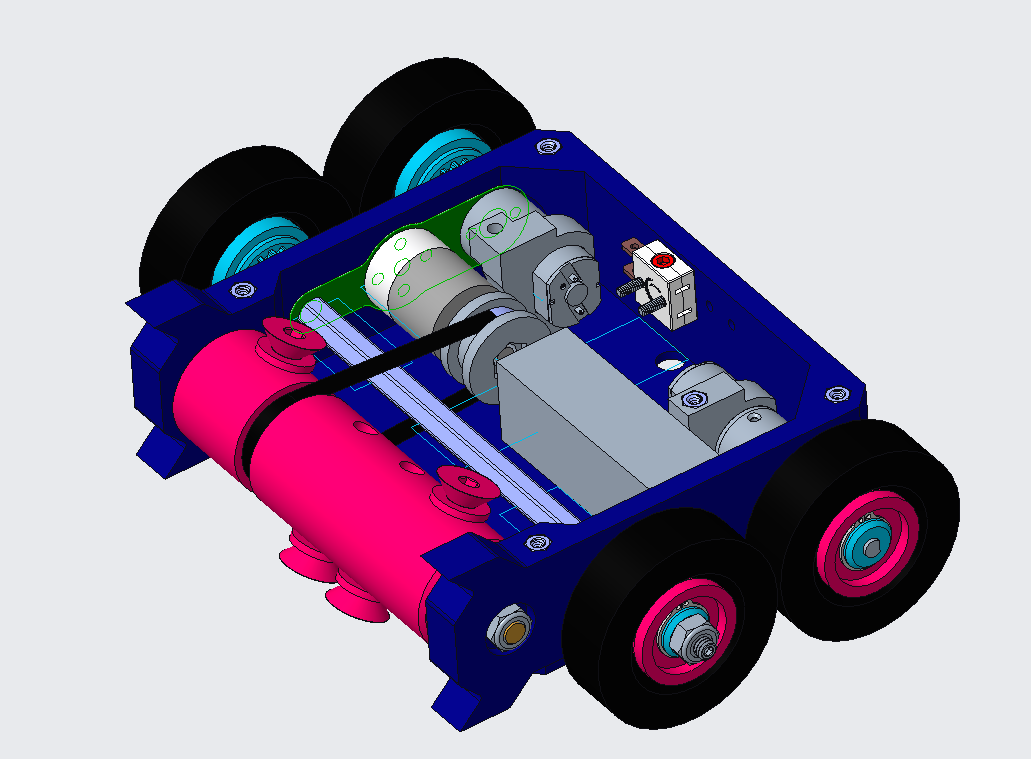
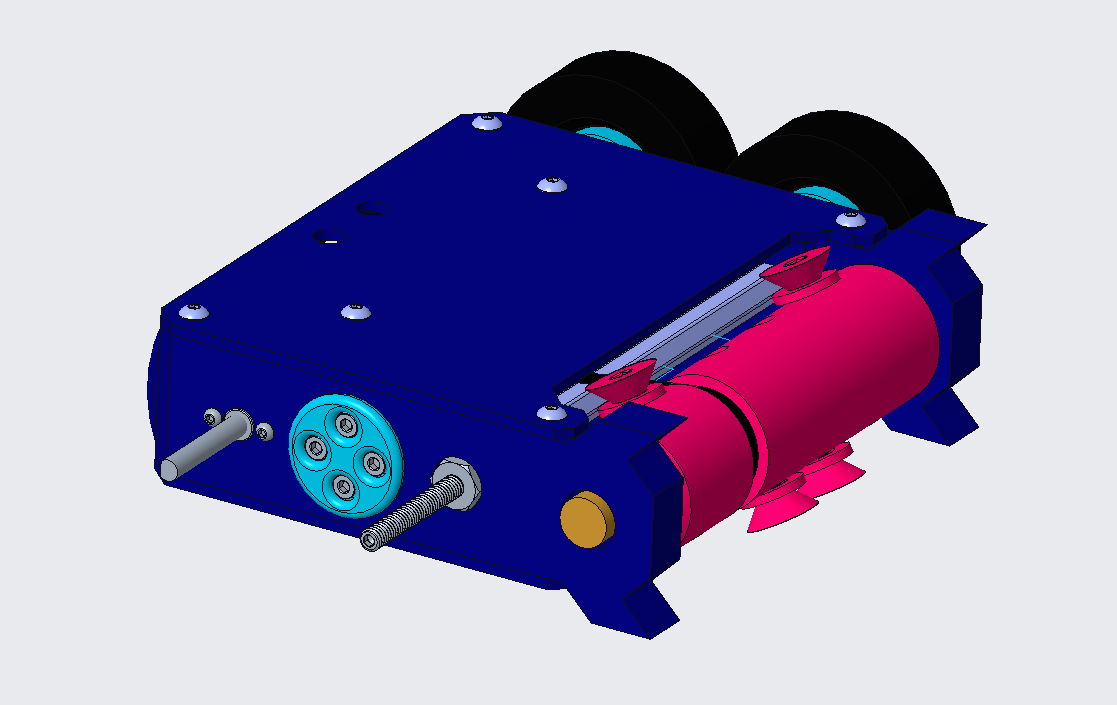
I decided to directly port over the belt drive from V3/V4, with the custom machined hubs and 0.25" O-ring belts, though instead of staggering the motors like in the previous iterations, they would both be positioned at the back of the robot.
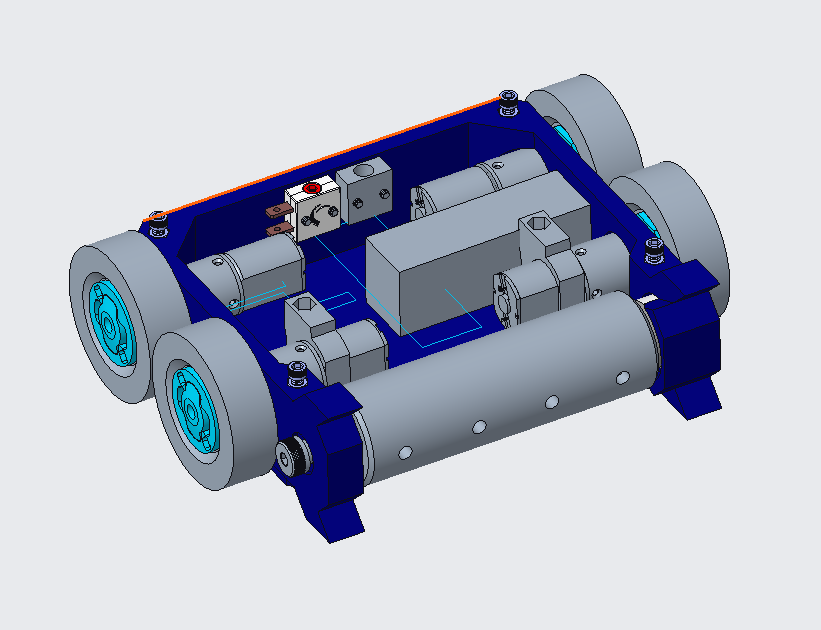
I was concerned about the belt tension causing the chassis to flex, which led to the giant standoff across the center of the bot. Into this standoff went a pair of threaded rods, after which a nut was placed on each rod to lock the standoff and the rod into the chassis. This would allow the hub to be placed onto it, and held on with a nylon lock washer.
This version actually had physical prototypes made, which showed me that while the front wheels would be locked to each other, the rear motors could still twist, even with the lids in place. This did not bode well for the reliability of this system in the long run, so I decided to look for other options.
5.2 - Direct Drive Repeat Brushed
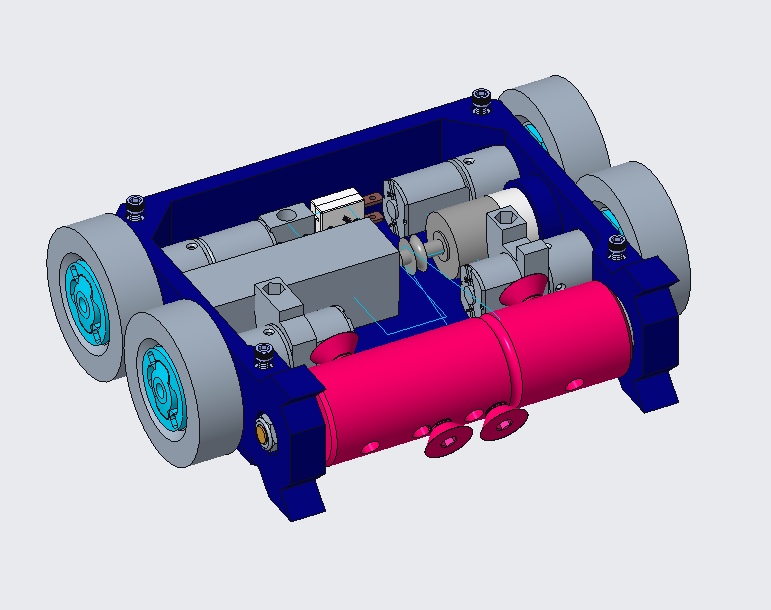
The solution I proposed to solve this issue was to remove the belt system entirely and directly drive each wheel with a Repeat Drive Brushed. While this would add about 52g, it would remove the belts and cut down the size of the hubs. In theory I had enough extra weight allowance built in that I could afford this, so I went ahead with the design and prototyping.
One thing I was concerned about was the front pair of motors. Now that I was putting these motors up front, They could theoretically flex the chassis enough to push the rear of the motor into the weapon, which would not be fun. I solved this problem with a small "halo" support, which would wrap around the rear part of the motor and bolt into the lids through the use of a standoff. These would be printed from PLA for the extra rigidity. While there was still a chance they could crack, They shouldn't be directly in any major load paths, so I pressed onward.
I did a bunch of physical prototyping, including making a new drum, but when I went to assemble everything, I found out I had miscalculated. I needed to cut about 20g from the bot.
5.3 - Direct Drive Everything!
My first solution to drastically cut weight was to directly drive the weapon motor, removing the belt from the equation entirely.
This idea began with removing the shoulder bolt and the needle roller bearings, as they wouldn't be placed inside the drum anymore. A hole would be bored from the center of the drum for the body of the motor to sit into, and a 3mm tapped hole would be placed in the center for the weapon motor to thread in to. This would be adhered with red loctite to prevent backing out. The motor would be battle-hardened using Robert Cowan's tutorial due to the larger shock loadings it would be seeing.
The other side of the drum would be tapped for a 10-24 bolt, allowing me to thread a 1/2" long shoulder screw into the bore. This would run through a needle roller bearing placed into the chassis.
This idea would solve two problems at once:
- Reduce weight by removing steel and aluminum from the weapon assembly
- Increase viable internal volume for electrical components
However, it came at the cost of not knowing how this motor would behave when being shock loaded. I decided that this was too much of a risk, and needed to find another solution.
5.4 - Belt drive Repeat Brushed (Again!)
I almost switched back to N20s here to save weight, but was convinced not to by people on the MRCA discord again. Someone asked about belt drive, and I had an epiphany.
The same "Halo" support I was using on 5.2 to prevent the front motors from pivoting into the weapon could be used on the rear motors to prevent the belt from pivoting them!
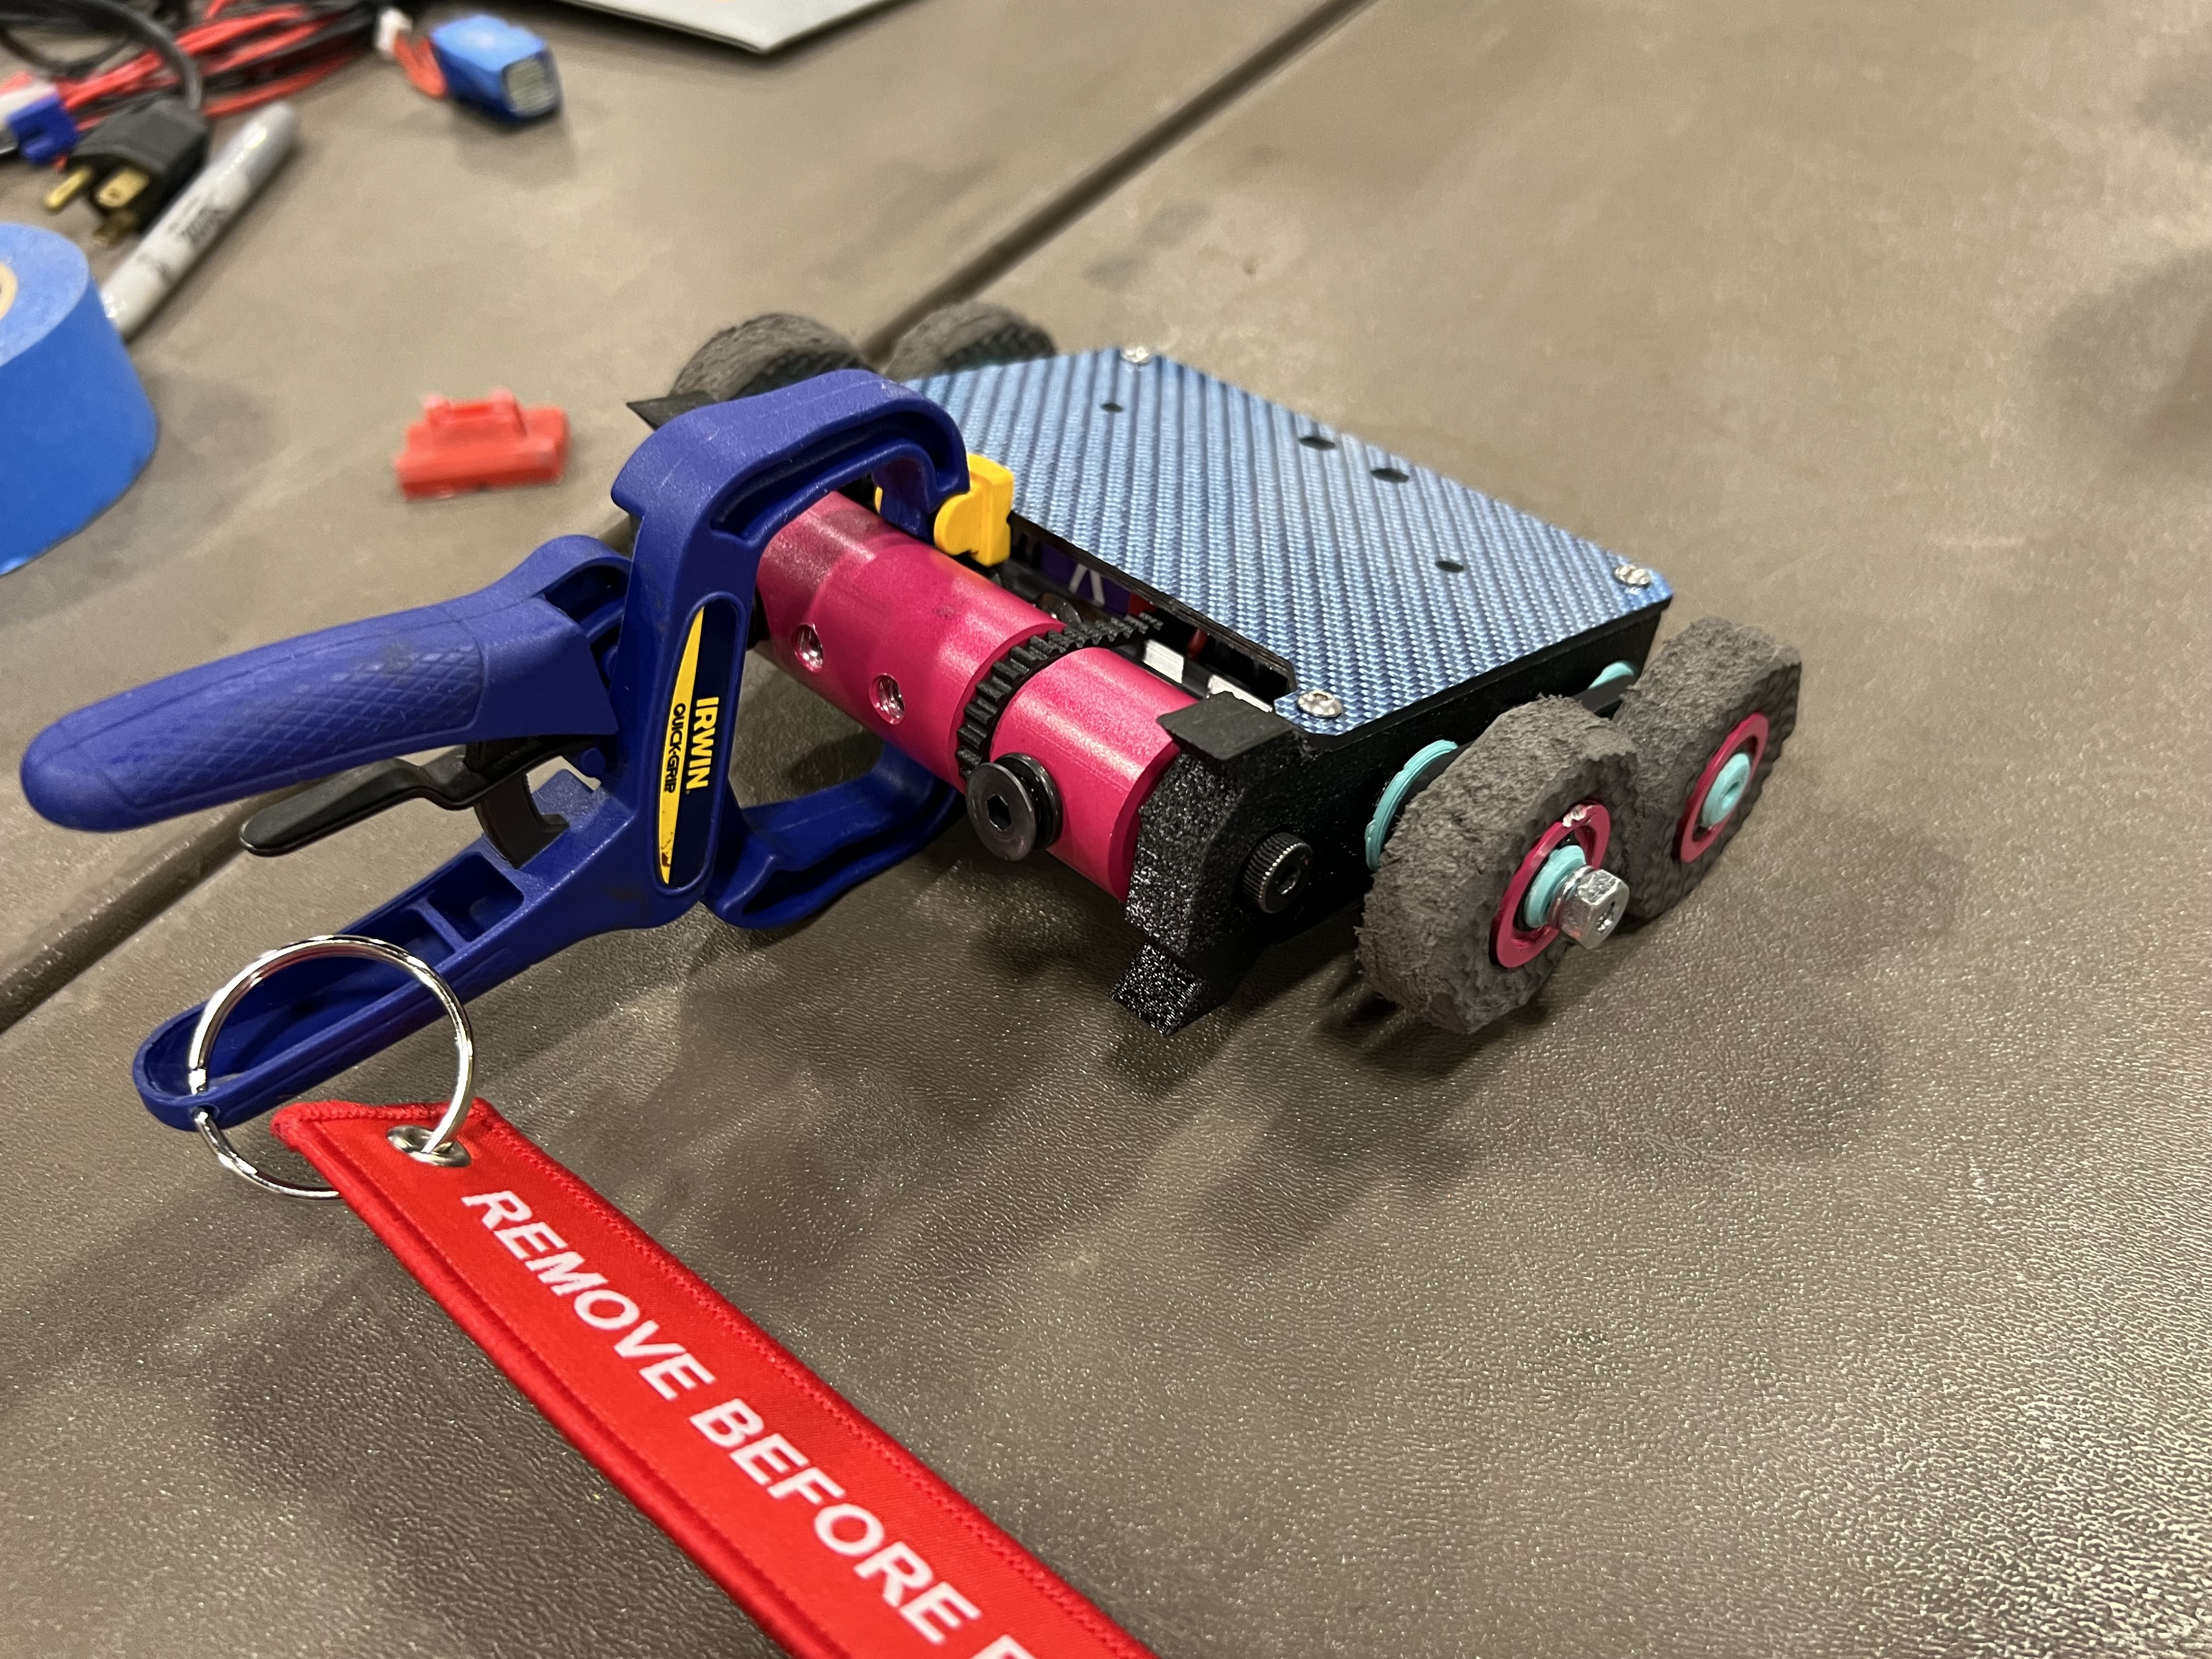
While this would solve my main blockade, another idea was sparked by Dean and Jake on the MRCA discord: Timing belts. The idea was simple: Timing belts require less tension to transfer torque than O-ring belts due to the teeth. While I wouldn't be able to turn custom hubs on a lathe like last time (which was the primary reason I went with O-rings instead of timing belts!), several people had successfully printed hubs by combining a pulley and a Fingertech hub in CAD.
I experimented with printing TPU hubs a bit, but decided to follow Jake's experience and print them out of PLA+. The TPU hubs were just a little too difficult to get printing successfully. While I was hesitant to use PLA again, a failure of a wheel hub would actually protect the motors. If I can get TPU hubs printing successfully, I'd love to switch over to those.
The actual pulleys are the Fingertech 16 tooth pulley mated to the Fingertech Snap Hub model in CREO. Since I didn't have a parametric version of the pulley file, I put the STL into Blender and widened it slightly, as the drooping parts of the print would grab the belt and prevent the pulley from twisting. The belt size selected is a 45 tooth belt, which when coupled with the 16 tooth pulley was almost exactly the right spacing for the pre-existing chassis design. it is a lot tighter than necessary, but it did work.
Turning attention to the weapon system, I did some spinup tests (IN MY NEW TEST BOX :D), and realized that the belt groove on the drum was too shallow, and the belt could slide out of it if I turned the robot while the weapon was spinning. I attempted to solve this by deepening the weapon groove and shortening the belt, but that could only do so much.
BLASTWAVE FIGHTS AT SEMO'S JULY JAMBOREE
Whomp Whomp
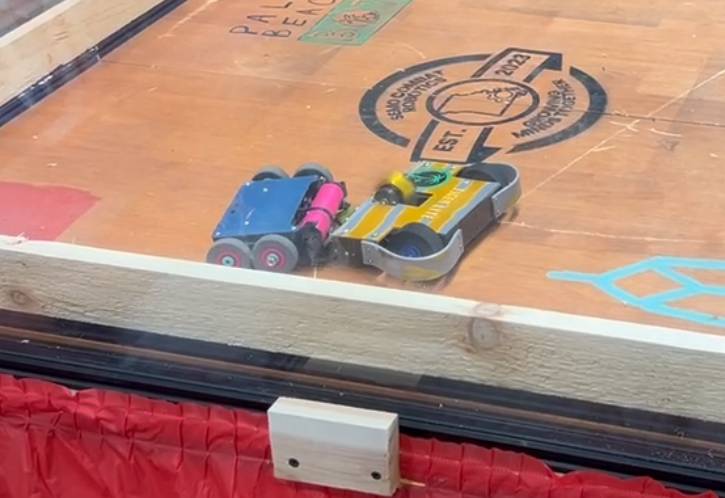
Blastwave's first fight at the SEMO July Jamboree was against Whomp Whomp, a Viper horizontal kit.
Blastwave got a good hit near the beginning, but then DID THE THING. It was a sketchy few seconds, but they knocked me down, flipping themselves in the process. I controlled the rest of the fight with pins since my weapon belt fell off, and won the match. I took some decent damage here, a pretty gnarly gash in one of the weapon supports that also bent one of the lid screws and damaged the lid there, but I just cut the offending part of the chassis off and we were all good.
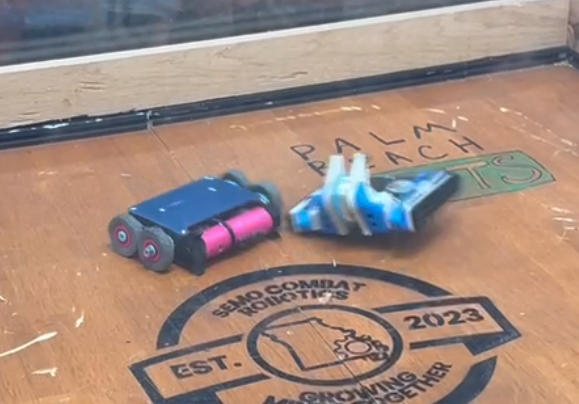
Waking Nightmare
Blastwave’s second fight was against Waking Nightmare, a viper lifter kit.
Blastwave managed to flip them over before the belt inevitably came off, and I controlled the match with pins and managed to take the judges' decision.
Tiger-Lyte
Blastwave's Third fight was against Tiger-Lite, a Viper Vertical kit.
Blastwave got several decent pops at the beginning, but eventually succumbed to the belt issues that had been plaguing it the whole event. Their weapon was basically a non-issue, as they couldn't effectively get under me to deliver it with their wedge design. they could still push me around, getting a couple decent pins, but I managed to eek out the win.
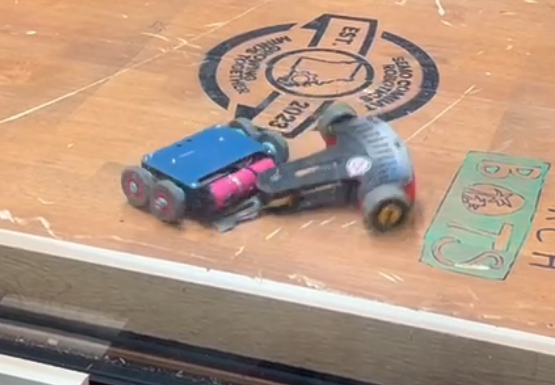
Soldier Boy
Blastwave's fourth fight was against Soldier Boy, a modular bot that could run either a vertical or a horizontal spinner, and was by far the scariest bot in the field that day. They ended up running the vert configuration, which was probably the right move.
They took out my drive pretty early on, and I tapped out since neither the weapon or the drivetrain was working. Blastwave was then sent to the losers bracket.
Pip Squeak
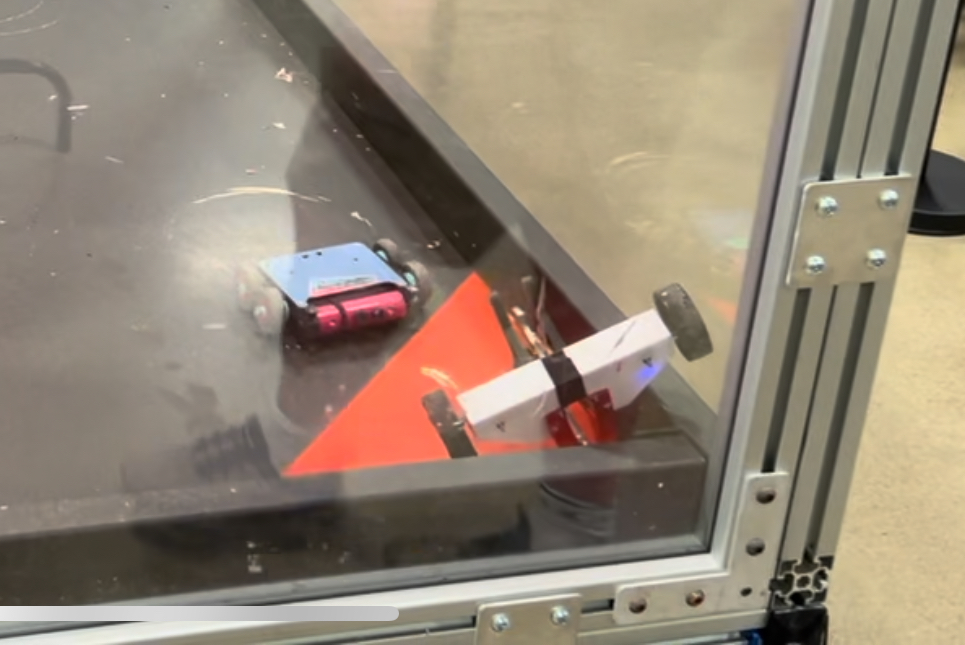
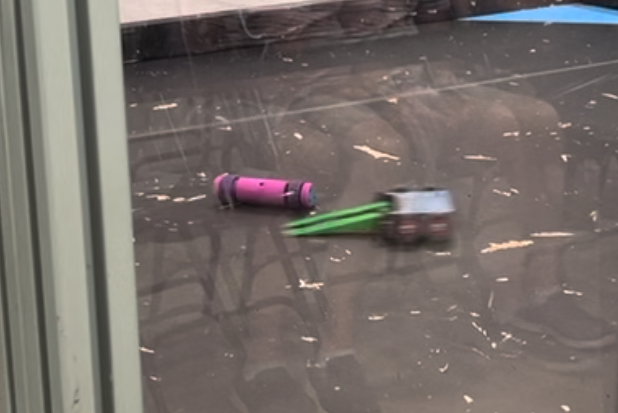
Blastwave's Fifth fight of the day was against Pip Squeak, a horizontal spinner. Whoever won this match would go to the finals and have to fight Soldier Boy again, and whoever lost would get third place.
The fight looked decent until they got entangled in my belt relatively early on, leading to an unstick. During the unsticking procedure the belt was pulled off the pulley, so I didn't have the weapon after that point. Their weapon had also stopped working after that point so it was all a pushing match. I got one really good pin where their weapon was squarely planted in the corner, but for some reason the referee counted to ten instead of five, so I could pin for twice as long as any other pin that day. During this pin, Pip Squeak rebooted his transmitter and regained weapon functionality. The fight would continue with me smashing my drum into the weapon, trying to control, but the fight would end in a second entanglement with the belt, and Blastwave would lose the Judges' decision as they took the damage category.
Blastwave was then knocked out of the tournament, but did get third place overall!
Blastwave V5.4 Post Mortem
Blastwave performed remarkably well at SEMO's July Jamboree. The weapon had issues, but overall still performed the best of any iteration up to this point. I noticed that even though Blastwave has a weapon, it's really more of a control bot, winning matches through pins and judges decisions.
I noted a few flaws that could be resolved:
- prevent belt from falling off
- prevent belt from getting tangled
- improve electronics packaging to reduce internal volume
These iterations would be improved for Blastwave 5.5, which would compete at Robot Smashing League's August event at the Armory.
Blastwave 5.5
Blastwave 5.5 started off relatively simple; swap the O-ring belt to an inverted timing belt. instead of using the teeth on the timing belt to transfer the torque, the belt would be turned inside out, transferring torque through friction. The main benefit of this is that the timing belt is less stretchy than the O-ring, and with the flat profile I can still manufacture the drums and pulleys by hand on my lathe. The groove on the drum would be deep enough that no horizontal can snipe the belt, and since it would have flat sides, there would be no chance of the belt riding out of the groove.
With this, I was also getting concerned about the flex in the chassis causing the motor mount to move with the belt tension. My solution to this was to place a small carbon fiber plate on that side of the chassis that would stiffen up that side. This plate would tie into the wheel mounts to rigidize everything. This pushed the drive motor 2mm out from the chassis, necessitating a modification to the motor halo on that side.
While I didn't get a chance to improve electronics packaging directly, This new mounting method moved the motor about 5-7mm closer to the wall, adding more space to the interior. It was still a real pain to force everything inside though!
Since I was editing things already, I also added some split lock washers under the impactor screws. This was shamelessly stolen from the Fingertech Beater Bar, the goal is just to increase the length of the teeth to hopefully get closer to the ground and increase tip speed slightly.
While the bot did work, I was having issues with my weapon motors; they weren't spinning. I'm pretty sure that the TPU chassis was compressing and allowing the mounting screws to tap the motor windings and damage them. In any case, I had only one motor working the night before RSL, and none of the hobby shops I stopped at on the way down had the 1308 motors I was using.
Blastwave 5.5 at the Armory
Chaotic Rampage
Blastwave's first fight was against chaotic rampage, a vertical spinner powered by a Just Cuz hubmotor. This thing definitely could pack a punch, though they spent most of the match flying through the air thanks to their own weapon. After burying their blade in the floor, they got their one free unstick, but promptly buried themselves again and got counted out. A win for Blastwave by virtue of not being stuck!
This fight somehow managed to damage Blastwave's weapon motor. From reviewing the footage, I spin down the weapon to allow for the safe unsticking, and then the weapon never spins back up. They did snipe the passive axle on that side at some point during the match, so maybe that shock caused some invisible damage to the motor? I'm not sure why spinning the motor down would completely kill it though.
Wedge Issue
Blastwave's second fight was against Wedge Issue, a wedge. Since I didn't have any spare weapon motors, I swapped in some of Melon Brawler's forks just for the lulz. This fight was super boring, I lost a Judge's Decision.
Since I was bored with the wedge life and out of spare weapon motors, I withdrew Blastwave from this competition, there just wasn't a point.
Blastwave 5.6
After the Armory, I started a set of minor upgrades that turned into a major overhaul.
The Viking weapon motors had finally left, and since they had been discontinued for years, I needed to find a new supplier. I couldn't find any 1308 motors (the 13 refers to the stator diameter, the 08 refers to the stator length, both in mm), but I could find some 1407 motors. They have the same overall package size, with a 12mm bolt circle, but with a couple of minor changes. The mounting screws were now M2.5 instead of M2, and the output shaft was not M5 instead of M4. These were relatively minor changes all things considered.
In an attempt to prevent the screws from deforming the chassis and damaging the weapon motor, I would be adding a small PLA+ disc to the outside. This would press against the carbon fiber weapon mount plate and rigidize the whole assembly.
I would also go through and remove most of the XT30 connectors used in the wiring, save for the battery to improve packing efficiency, which went a long way to helping me cram everything inside more easily.